How to Clean a Fabric Sofa: The Complete Step-by-Step Guide
From daily upkeep to deep cleaning and stubborn stain removal — everything you need to keep your fabric couch looking fresh, smelling great, and lasting for years.
Why this guide matters: A fabric sofa is often the most-used piece of furniture in any home. Without proper cleaning, embedded dirt, body oils, and accidental spills break down fibers, cause discoloration, and create lingering odors. This guide gives you a clear, proven system — whether you own a standard fabric sofa, a large sectional, or a compact loveseat.
What's Covered in This Guide
- Understanding Fabric Types and Cleaning Codes
- Essential Tools and Cleaning Supplies
- Routine Maintenance: Weekly Habits That Matter
- Deep Cleaning Your Fabric Sofa Step by Step
- Stain Removal Guide by Stain Type
- How to Eliminate Odors from Fabric Sofas
- Proper Drying and Aftercare
- Protecting Your Fabric Sofa After Cleaning
- Common Mistakes to Avoid
- When to Call a Professional Cleaner
- Frequently Asked Questions
1. Understanding Fabric Types and Cleaning Codes
Before you apply any cleaning method to your sofa, you need to know what type of fabric you are dealing with. The wrong approach can permanently damage the material — causing shrinkage, color bleeding, or water stains that are impossible to reverse.
Fabric Cleaning Codes Explained
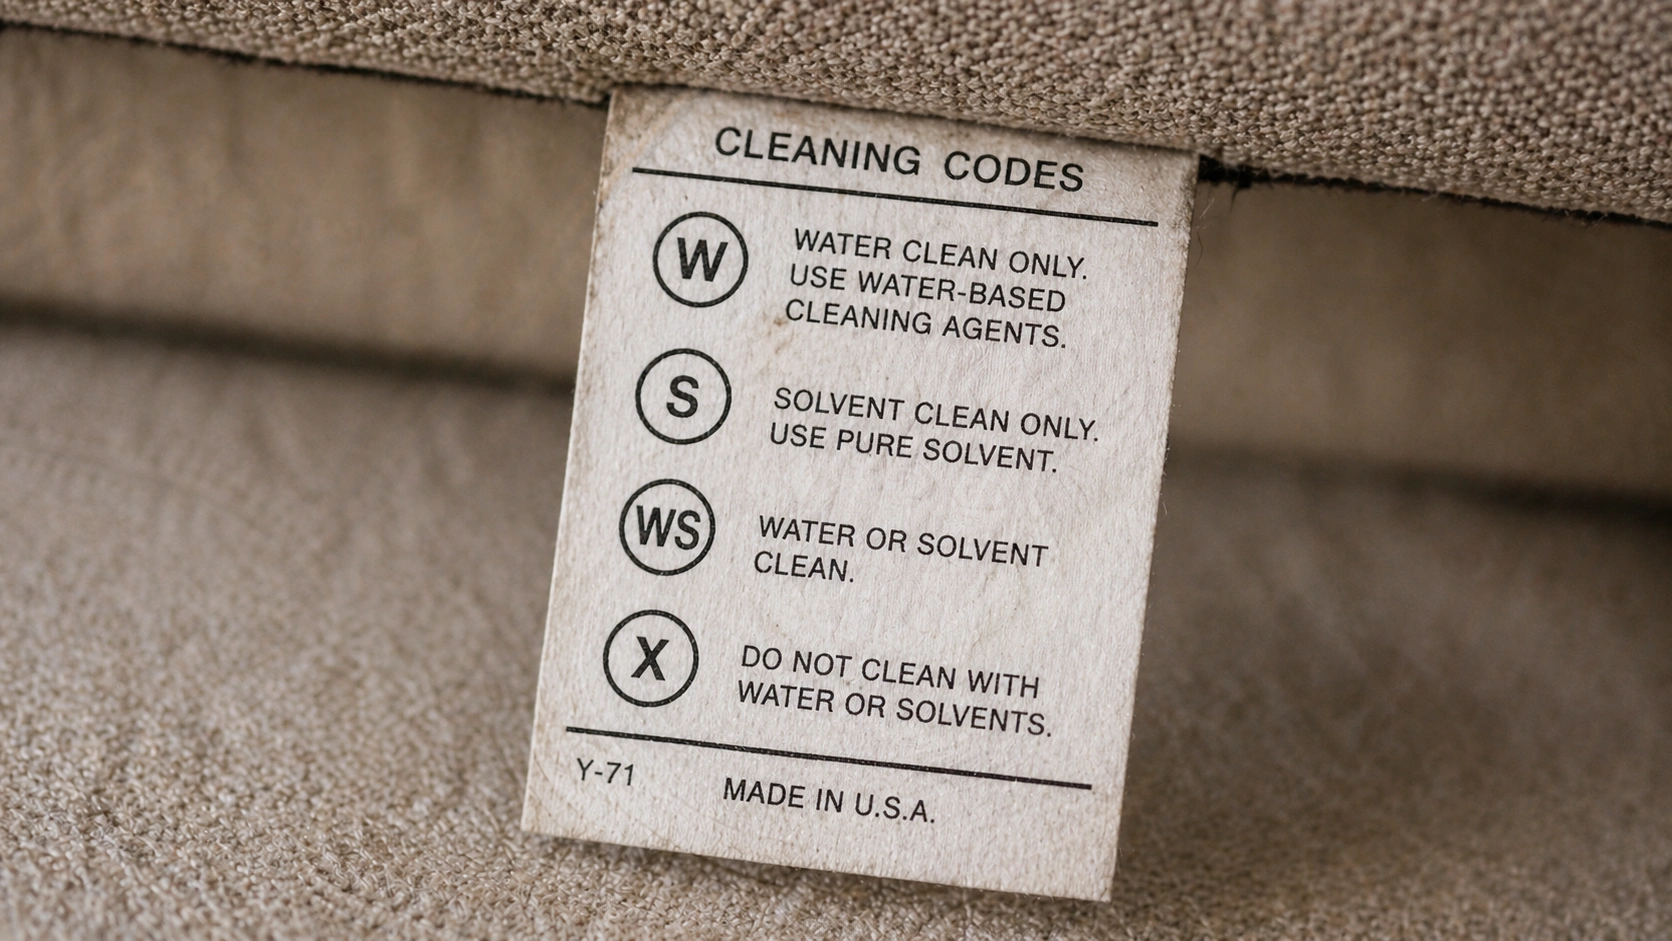
Every upholstered sofa comes with a care label, typically found beneath the cushions or on the underside of the frame. This label displays a standardized cleaning code that tells you exactly which cleaning methods are safe to use:
| Code | Meaning | Safe Cleaning Methods | What to Avoid |
|---|---|---|---|
| W | Water-based cleaning | Mild dish soap, upholstery shampoo, steam cleaning | No harsh chemicals or bleach |
| S | Solvent-based cleaning only | Dry-cleaning solvents, professional dry cleaning | Avoid all water — no water-based solutions |
| WS | Water or solvent | Mild detergent, dry-cleaning solvent, professional foam | Avoid excessive water, rubbing, or bleach |
| X | Vacuum or brush only | Vacuuming, light brushing, professional cleaning only | No water, no solvents, no cleaning products at all |
Important: If your sofa's tag shows an "S" or "X" code, DIY cleaning carries significant risk. For these fabrics, we strongly recommend hiring a professional upholstery cleaner to avoid irreversible damage. You can learn more about durable fabric choices if you are considering a future purchase.
Common Fabric Types and Their Characteristics
Different fabrics respond differently to cleaning methods. Here is a quick reference to help you understand what you are working with:
If you are still in the shopping phase and want a sofa that is easier to maintain, consider a washable sofa with removable, machine-washable covers. For a detailed material breakdown, see our complete sofa materials guide.
2. Essential Tools and Cleaning Supplies
Having the right tools on hand before you start cleaning saves time and prevents damage. Here is everything you need for an effective fabric sofa cleaning session:

Cleaning Tools
Cleaning Solutions
DIY Upholstery Cleaning Solution (for W and WS coded fabrics)
- 1 quart warm water
- 1 teaspoon mild liquid dish soap (clear, not gel)
- 1 tablespoon white vinegar (helps break down grease and neutralize odors)
- Optional: 5 drops of essential oil (lavender or tea tree) for freshness
For tougher stains, you may also want a dedicated upholstery cleaner formulated for fabric. Always read the product label to confirm it is compatible with your fabric type. If you are dealing with specific stain challenges, our comprehensive stain removal guide covers additional specialized products.
3. Routine Maintenance: Weekly Habits That Matter
The single most effective way to keep your fabric sofa clean is consistent, light maintenance. Regular upkeep prevents dirt from becoming embedded in the fibers — which is what causes discoloration, odors, and premature wear over time. This is especially critical for households with children or pets.

Weekly Maintenance Checklist
-
Vacuum All Surfaces
Use the upholstery brush attachment to vacuum the seat cushions, backrests, armrests, and throw pillows. Pay extra attention to seams, crevices, and the area where the cushions meet the frame — these spots trap crumbs, pet hair, and dust bunnies.
-
Fluff and Rotate Cushions
Remove all loose cushions, fluff them by hand to redistribute the filling, and rotate or flip them. This ensures even wear and prevents permanent indentations. If your cushions have lost their shape, rotating helps extend their life.
-
Wipe Down Armrests and Headrests
These areas accumulate body oils, sweat, and hair products faster than any other part of the sofa. Dampen a microfiber cloth with plain water, wring it out thoroughly, and wipe these high-contact areas. Dry immediately with a clean cloth.
-
Brush Fabric Pile (if applicable)
For fabrics like velvet, corduroy, or corduroy couches, use a soft-bristle brush to gently lift the nap and remove trapped particles. Always brush in the direction of the nap.
-
Treat Spills Immediately
The golden rule of fabric care: address spills within minutes. Blot — never rub — with a clean, dry cloth. The faster you act, the less likely a stain will set. Keep a clean cloth stored nearby for this reason.
Pro tip: If you notice fabric pilling (those tiny fuzz balls on the surface), use a fabric shaver or a clean sweater stone to gently remove them. Pilling is normal for many blended fabrics and does not indicate poor quality.
4. Deep Cleaning Your Fabric Sofa Step by Step
Even with diligent weekly maintenance, every fabric sofa benefits from a thorough deep cleaning every 3 to 6 months. Deep cleaning removes the embedded dirt, body oils, and allergens that regular vacuuming cannot reach. This process is essential for maintaining both the appearance and hygiene of your furniture.

Complete Deep Cleaning Process
-
Remove All Cushions and Covers
Take off all removable cushions, throw pillows, and any slipcovers. If your sofa has washable covers, check the care label and launder them separately according to instructions. This gives you full access to the frame and all surfaces.
-
Vacuum Thoroughly
Go over every inch of the sofa with your upholstery attachment. Vacuum the base, back, sides, and underneath the cushions. Use a crevice tool for seams and any gaps between the frame and cushion areas.
-
Spot Test Your Cleaning Solution
Apply a small amount of your cleaning solution to an inconspicuous area — typically the back of the sofa or the underside of a cushion. Wait 10–15 minutes, then blot dry. Check for any color transfer, discoloration, or texture change before proceeding.
-
Work in Sections — Top to Bottom
Starting from the top of the sofa (backrest) and working downward prevents dirty water from dripping onto already-cleaned areas. Lightly mist the cleaning solution onto one section at a time — never saturate the fabric.
-
Gently Agitate with a Soft Brush
Using a soft-bristle brush, gently work the cleaning solution into the fabric using circular motions. Focus on areas that show visible soiling, body oil buildup on armrests and headrests, and any lightly stained spots.
-
Blot Away the Dirt and Residue
Use clean, dry white towels to blot away the loosened dirt and cleaning solution. Change towels frequently as they become soiled. Continue blotting until no more dirt transfers to the towel.
-
Rinse with a Damp Cloth
Dampen a clean microfiber cloth with plain water (wring it out well — it should be barely damp, not wet). Wipe each cleaned section to remove any soap residue. Leftover residue attracts dirt and can make the fabric feel stiff.
-
Dry Completely
Blot with dry towels, then allow the sofa to air dry. Open windows, run ceiling fans, or use a portable fan to speed up drying. Never use a hair dryer on high heat, as it can shrink or damage the fabric. See our detailed drying and aftercare section below.
Critical rule: Never oversaturate your fabric sofa. Excess water can penetrate the foam cushion filling, leading to mold growth, unpleasant odors, and structural damage that may require expensive cushion repair or replacement.
5. Stain Removal Guide by Stain Type
Not all stains are created equal. The cleaning method that works for a coffee spill can make a grease stain worse. Understanding the nature of different stains allows you to choose the right treatment and avoid making the problem bigger. For an even more detailed reference, see our complete stain removal guide.

Coffee & Tea
Blot immediately. Mix 1 tbsp liquid dish soap with 2 cups warm water. Dab the stain from the outside in. For dried stains, add 1 tbsp white vinegar to the solution. Rinse and blot dry.
Red Wine
Blot immediately with a dry cloth. Sprinkle salt on the wet stain to absorb liquid. After 10 minutes, vacuum the salt. Apply a mix of dish soap and hydrogen peroxide (3%) to remaining stain. Blot and rinse.
Grease & Food Oils
Do not use water — it spreads grease. Sprinkle baking soda or cornstarch liberally on the stain. Let it sit for 15–30 minutes to absorb oil. Vacuum thoroughly. Repeat if needed. For residue, dab with rubbing alcohol.
Pet Accidents (Urine)
Blot excess liquid. Apply a solution of 1 part white vinegar to 1 part water. Let it sit for 5 minutes, then blot. Sprinkle baking soda over the area, let dry, then vacuum. An enzymatic cleaner works best for lingering odor.
Ink & Marker
Dab (never rub) with rubbing alcohol on a cotton swab, working from the outside of the stain inward. For ballpoint ink, hairspray can also work. Blot with a damp cloth after treatment. Test on a hidden area first.
Mud & Dirt
Let mud dry completely — do not try to clean while wet, as this pushes mud deeper into fibers. Once dry, vacuum thoroughly. Then use a dry brush to loosen remaining particles. Spot clean any remaining discoloration with mild soap solution.
Blood
Use cold water only — hot water sets blood stains permanently. Blot with cold water and a clean cloth. For dried blood, make a paste of hydrogen peroxide and cornstarch, apply to the stain, let sit 30 minutes, then brush off and rinse with cold water.
Chocolate
Gently scrape off excess with a dull edge (spoon or credit card). Apply a solution of dish soap and warm water. Blot from outside in. For oily residue, follow up with a baking soda treatment. Rinse and dry.
Universal stain removal rules: Always blot — never rub. Always work from the outside of the stain toward the center to prevent spreading. Always spot-test any solution first. And always address stains as quickly as possible — the longer a stain sits, the harder it is to remove.
6. How to Eliminate Odors from Fabric Sofas
Even when your sofa looks clean, trapped odors from pets, cooking, sweat, and spills can make it unpleasant to sit on. Odor molecules embed themselves deep within fabric fibers and cushion foam, so surface cleaning alone often is not enough. If your sofa has a persistent bad smell, check our dedicated odor troubleshooting guide.
The Baking Soda Method (Best for General Odors)
This is the simplest and most effective DIY method for neutralizing fabric odors:
- Remove all cushions and pillows from the sofa.
- Sprinkle a generous, even layer of baking soda over all fabric surfaces — seat, back, arms, and cushions.
- Use a dry brush to gently work the baking soda into the fabric fibers.
- Let it sit for a minimum of 2 hours (overnight is even better for strong odors).
- Vacuum thoroughly with the upholstery brush attachment to remove all baking soda.
White Vinegar Spray (For Stubborn Odors)
Mix equal parts white vinegar and water in a spray bottle. Lightly mist the sofa surface — do not saturate. Vinegar neutralizes odor-causing bacteria and the vinegar smell dissipates completely as it dries. This method is particularly effective for pet-related odors on sofas exposed to pets.
Additional Odor-Fighting Strategies
- Activated charcoal bags: Place a few bags under and around the sofa — they passively absorb odors over weeks.
- Essential oil spray: Add 10–15 drops of lavender, tea tree, or lemon oil to a spray bottle of water. Mist lightly for a fresh scent (not a substitute for actual cleaning).
- Sunshine and airflow: On a dry day, open windows near the sofa and let fresh air circulate. UV rays naturally kill odor-causing bacteria.
- Enzymatic cleaners: For biological odors (pet urine, vomit, food spills), enzymatic cleaners break down the organic matter causing the smell — they are far more effective than surface cleaning alone.
7. Proper Drying and Aftercare
How you dry your fabric sofa after cleaning is just as important as the cleaning process itself. Improper drying is the number one cause of mold, mildew, and musty odors in upholstered furniture.

Best Practices for Drying
- Blot first: Use clean, dry white towels to absorb as much moisture as possible immediately after cleaning.
- Maximize airflow: Open windows, turn on ceiling fans, and position a portable fan to blow across the sofa surface.
- Use indirect air only: Room-temperature or slightly warm airflow is ideal. Never point a hair dryer directly at the fabric.
- Keep cushions separated: If you removed cushions for cleaning, do not restack them until each piece is completely dry to the touch.
- Wait before use: Allow at least 4–6 hours of drying time for light cleaning, and 12–24 hours for deep cleaning. In humid conditions, drying may take even longer.
Warning signs of moisture problems: If you notice a damp, musty smell after cleaning, the interior cushion foam may still be wet. This requires immediate action — continue drying with fans, or in severe cases, the cushions may need to be removed and dried separately to prevent mold growth inside the foam.
Post-Cleaning Care Routine
After your sofa is fully dry, take these steps to maintain the results of your cleaning effort:
- Lightly brush the fabric with a soft-bristle brush to restore the nap and texture.
- Replace cushions in their original positions (or rotate them for even wear).
- Apply fabric protection spray (covered in the next section) to guard against future stains.
- Resume your weekly vacuuming schedule to prevent new dirt from accumulating.
8. Protecting Your Fabric Sofa After Cleaning
Applying a fabric protection treatment after cleaning is one of the smartest investments you can make in your sofa's longevity. Fabric protectors create an invisible barrier that repels liquids and prevents stains from bonding with the fibers — giving you precious extra time to blot spills before they become permanent stains.

How to Apply Fabric Protection Spray
- Ensure the sofa is completely clean and 100% dry before application.
- Test the protector on a hidden area first to confirm compatibility.
- Hold the spray can 6–8 inches from the fabric surface.
- Apply in light, even sweeps — overlapping slightly for full coverage.
- Do not oversaturate — a thin, even mist is all that is needed.
- Allow to dry completely (typically 2–4 hours) before using the sofa.
- Reapply every 6–12 months or after any deep cleaning session.
For comprehensive protection strategies, including UV protection and pet-proofing, read our complete sofa protection guide. If you want a more robust defense, consider adding sofa covers or a slipcovered sofa setup that can be removed and laundered regularly.
Additional Protective Measures
- Position wisely: Keep your sofa away from direct sunlight to prevent fading — this is especially important for UV protection of colored and patterned fabrics.
- Use throw blankets strategically: Drape a washable throw over the seat area where you sit most often. This catches the majority of body oils, crumbs, and pet hair.
- Add decorative pillows: Throws and pillows serve double duty — they add style and protect high-contact areas from direct wear.
- Establish house rules: No eating messy foods on the sofa, keep shoes off, and train pets to use their designated resting spots. Simple rules dramatically reduce cleaning frequency.
9. Common Mistakes to Avoid
Even well-intentioned sofa owners make cleaning errors that can cause permanent damage. Avoiding these mistakes will save you money, protect your investment, and keep your sofa looking its best for years.
- Using too much water: Oversaturating fabric is the most common and most damaging mistake. It leads to water stains, mold growth, and ruined cushion foam. Less is more — mist, do not soak.
- Rubbing stains instead of blotting: Rubbing pushes the stain deeper into the fibers and spreads it over a larger area. Always blot firmly with a clean cloth, working from the outside in.
- Ignoring the cleaning code: Using water on an "S" coded fabric or applying harsh chemicals to a "W" coded fabric can cause irreversible damage. Always check the tag first.
- Skippping the spot test: Even mild cleaners can cause discoloration on certain dyes and fabrics. A 5-minute spot test can prevent a costly mistake.
- Using colored towels: Colored towels can transfer dye to wet fabric, creating a new stain that is extremely difficult to remove. Always use white towels and cloths.
- Using bleach or harsh chemicals: Bleach weakens fabric fibers, causes discoloration, and can dissolve stitching. Stick to mild, fabric-safe cleaning solutions.
- Not drying thoroughly: Leaving even slight moisture in the fabric or cushions creates the perfect environment for mold and mildew. Always ensure complete drying.
- Cleaning only when stains are visible: By the time you see a stain, dirt and oils have already accumulated. Consistent maintenance prevents visible problems from developing.
- Using a steam cleaner without testing: While steam cleaning can be effective for some fabrics, it can shrink delicate materials and damage adhesives. Always verify your fabric can handle moisture and heat before steaming.
- Forgetting to clean the frame and legs: Dirt and dust on wooden or metal frames can transfer to the fabric. Wipe down the frame during every cleaning session to prevent cross-contamination.
DO
- Blot spills immediately
- Vacuum weekly
- Test all products first
- Work in small sections
- Use white towels only
- Allow full drying time
- Reapply fabric protector regularly
- Rotate cushions monthly
DON'T
- Rub or scrub stains
- Oversaturate the fabric
- Use bleach or abrasives
- Ignore cleaning codes
- Use colored towels
- Rush the drying process
- Use heat to speed drying
- Wait until stains are visible to clean
10. When to Call a Professional Cleaner
While most routine cleaning and minor stain removal can be handled effectively at home, certain situations call for professional expertise. Knowing when to DIY and when to hire a pro can save you from costly mistakes — or save you money on unnecessary service calls.
Call a Professional When:
- The care tag shows "S" or "X": These fabrics require solvent-based cleaning or vacuum-only maintenance. Attempting water-based DIY methods can cause permanent damage.
- The stain covers a large area: Widespread stains from flooding, pet accidents, or major spills are difficult to treat evenly with DIY methods. Professionals have industrial-grade equipment that extracts moisture and cleaning solutions thoroughly.
- Odor persists after multiple cleaning attempts: If your sofa still smells after you have tried baking soda, vinegar, and enzymatic cleaners, the odor source may be deep inside the cushion foam — a problem that requires professional extraction.
- You see signs of mold or mildew: Dark spots, a persistent musty smell, or allergic reactions when sitting on the sofa indicate mold growth. This requires professional treatment to ensure complete remediation.
- The fabric is delicate or valuable: Silk, antique upholstery, and high-end designer fabrics should always be cleaned by professionals who specialize in delicate materials.
- The sofa is still under warranty: Some manufacturer warranties require professional cleaning at specified intervals. DIY cleaning could void your coverage.
Professional upholstery cleaning typically costs between $100 and $300 depending on the sofa size and condition. For most households, scheduling a professional cleaning once a year — combined with regular home maintenance — provides the best balance of cost and results.
If your sofa has structural issues beyond cleaning — such as sagging cushions, a damaged frame, or loose legs — those problems need to be addressed separately before or alongside professional cleaning.
11. Frequently Asked Questions
Ready to Upgrade to an Easy-to-Clean Sofa?
If your current sofa is showing its age despite your best cleaning efforts, it might be time for an upgrade. Explore our curated selection of fabric sofas designed for everyday life.
Explore Sofa Options